This guide describes what you need to do to set up a guest virtual machine using KVM or VirtualBox, on a Linux host. For other virtualisation environments, and other host operating systems, you will need to read the relevant documentation.
Hardware support for virtualisation (VT) is something that most mainstream CPUs (AMD & Intel) now support as standard. Without it, your virtual machines will run much slower (especially noticeable when running VMs with a GUI). Unfortunately some PC manufacturers still ship hardware with VT disabled, although the trend seems to be towards shipping PCs with VT switched on. If VT is disabled, you will need to enable it in the BIOS. Some manufacturers ship a BIOS with no option to enable VT, and no way to view the VT status, which means having to flash a newer version of the manufacturer's BIOS, or a third-party generic BIOS. This is something that you probably don't want to get involved with, so if buying a new PC (desktop or laptop) to use as a virtualisation host, I suggest that you stick to a manufacturer who ships their machines with VT enabled (I know that ACER does, and am fairly certain that Lenovo also does - if you want to find out, spend some time searching on Google before buying a PC).
If you already have a PC, and can't find out whether VT is enabled (and so don't know if you want to use it as your virtualisation host), then installing Linux will allow you to find out. Once you have Linux, install KVM/QEMU; if VT is enabled, a new device (/dev/kvm) will be created. You can even do this using a Linux Live-CD (e.g. from Ubuntu), without installing Linux (your existing operating system will be untouched): boot from the Linux Live-CD, select "Try ...", install KVM (it will be installed only in RAM), and then check to see if /dev/kvm exists.
I most strongly recommend Linux for the host, because of all the free software available, because of performance (because Windows has such dreadful virtual memory management, and because Linux is just so much faster, booting and using applications) and because of network limitations in Windows (only one IPv4 and one IPv6 address per network interface). Ubuntu Linux is completely free, and supports pretty much all PC hardware; you can download it from here, burn it onto a DVD, and install it on the host computer (but read the comments about using a hard-disc as your VM's virtual disc, in the next section, before installing a new host operating system).
This article fouses mainly on virtualisation using free software. If you want to use something propriatary, such as VM-Ware, you should read the vendor's documentation carefully.
Your choice of virtualisation system may be constrained by your host operating system.
The table below will help you choose virtualisation software to meet your needs.
Requirement | Recommended |
Raw computing performance (e.g. for virtualising servers). | virt-manager/KVM |
Eficient use of host RAM. | virt-manager/KVM |
Easy set-up and configuration. | VirtualBox |
Dynamic (e.g. while the VM is running) addition of attached hardware (e.g. a web-cam or USB device) | VirtualBox |
Easy viewing of host resources (CPU, RAM, Network I/O, Disc I/O) being used by the VM. | virt-manager |
NAT network connection of your VM. | VirtualBox (has built-in NAT and DHCP support) |
Space and time efficient back-up | virt-manager/KVM (with VirtualBox you need to backup your virtual discs using file-copy, which consumes host disc space even for empty blocks, and copying empty block takes time) |
Easy installation of the VM operating system. | VirtualBox is sligtly easier, because you can more easily mount/attach installation media (either physical discs or an ISO image file) |
Swtching between different networking scenarios. | VirtualBox, because you can configure up to 4 virtual network interfaces (e.g. for NAT and for direct) and enable/disable them as required (but not while the VM is running!) |
Many of the decisions that you need to make later will depend on what operating system you will virtualise.
If you want to virtualise Linux or Unix, starting with an installation disc I recommend that you use KVM and virt-manager, for reasons of performance. Linux kernels have drivers for virtio interfaces built-in, giving very fast I/O on your VMs. Virt-manager makes it much easier to view and control your VM's configuration.
If you want to use an existing hard-disc or SSD drive, holding a pre-installed operating system, for your VM, I recommend using VirtualBox. Many modern computers (laptops and desktops) come with an SSD with Windows installed on it, and there is a simple procedure to utilise this as the "virtual" hard-disc for a VM (see here and here). You would then need to install the host operating system (e.g. Linux) on another drive so that the host boots from this drive rather than the drive on which Windows is installed.
If you want to virtualise Windows 7 or later versions, or a MAC operating system then don't even try with KVM; use VirtualBox.
If you want to virtualise Windows-XP, I suggest either VirtualBox, or for better performance, KVM and virt-manager. KVM/QEMU has had a few updates over the last year or two which have made it more difficult to get Windows-XP VMs working without virt-manager; I even had some Windows-XP VMs which worked fine for years when started under KVM from the Linux command-line, but can now only be started using virt-manager.
Creating a virtual machine is relatively straightforward. You need to:
Here are some example settings which work for running VMs from the Linux command line, from virt-manager and from VirtualBox.
Typically, the largest consumption of disc space is from:
Windows automatically creates a swap file (pagefile.sys) at installation time, which is 2.5 times the size of your RAM. If you want a smaller ratio, allocate a smaller amount of RAM when you install, and increase it next time you start the VM. Linux and Unix make the same assumptions, but you do have the choice to manually set the amount of swap space if you want.
Keeping your documents in the host's file system (in Windows terminology, adding a Network Drive, shared by the host using Samba; for a Linux VM, mounting a host file system, shared by the host using either NFS or Samba) stops you using up space in your virtual disc for these files, and enables you to share files between the host and one or more VMs. If you have a reason to keep documents in the VM, then you will need to adjust the size of the virtual disc accordingly; remember that if you run out of disc space, although it is possible to enlarge a virtual disc once it contains data, it is a real pain, so make sure that you create enough storage from the start.
Generally, I only install applications in my VMs which are not available for the host (MS-Office, MS-Project and MS-Visio), plus a browser (or several browsers, if the VM is for web-site testing). Other applications (an FTP client, LibreOffice, a code editor, compilers, a bit-torrent client, a video editor, and media player and a music player) are installed on the host. This reduces demand for the VM's virtual disc, and ensures that these applications run at maximum speed.
I usually create a 120GB virtual drive for each VM. A Linux (e.g. a web-server) VM will usually need about 12GB to 15GB; a Windows-XP VM will need around 25GB, and a Windows 7 VM at least 70GB (Windows 10 needs even more). Creating a 120GB virtual disc will give you enough space for growth, and if you use a raw, qcow or qcow2 format virtual disc, only the part of that 120GB which contains actual data will consume space on your host's hard drive.
Exactly what you decide to do depends on your requirements.
You might feel that the various network configurations are rather complicated, and opt for something simpler. For example, you might just decide to use the VirtualBox built-in Bridged Adaptor functionality (you can use this to tap-in to the wireless or wired-Ethernet adaptor), but there are downsides:
The table below summarises my networking recommendations.
Scenario | Recommended |
virt-manager/KVM/QEMU, with VMs reachable over LAN or Internet (e.g. for web-servers). | Create a soft-bridge and a tap for each VM. |
virt-manager/KVM/QEMU, with VMs not reachable (e.g. for a desktop VM). | Create a soft-bridge and a tap for each VM. |
VirtualBox, with VMs reachable over LAN or Internet (e.g. for web-servers). | Use a network connection bridged to either your host's ethernet or WiFi adaptor. |
VirtualBox, with VMs not reachable (e.g. for a desktop VM). | Use a NAT network connection (will work over both ethernet and WiFi). |
The text in the sections that follow describe a wider range of options.
KVM supports something called "User Networking". The documentation says that you can use this if you don't want your VM to be reachable from other network devices (i.e. no good for servers, or if you want remote desktop access via RDP), and if you are prepared to accept a major performance hit (this is no joke; even on a powerful machine, the performance is horribly slow). I don't recommend it.
KVM also supports a networking mode called Private Virtual Bridge. This allows you to set up a private network between 2 or more virtual machines, but they will not be reachable from elsewhere on your LAN or host machine (again, no good for servers, or if you want remote desktop access via RDP). This mode is of very limited use.
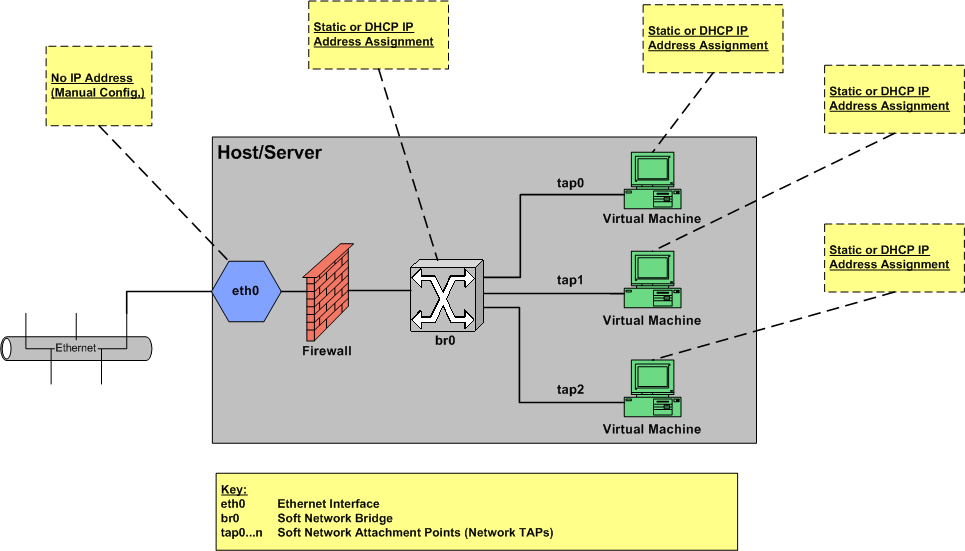
The most useful networking mode is "Public Bridge" networking (described in more detail here). This works well: it is reliable and fast/efficient. It allows you to make VMs accessible from the host (for RDP access, SSH access, etc.) from other computers on your home or office LAN, and from the public Internet (e.g. for web-servers). If you want to limit access you can control this with the firewall on your host, and the port-forwarding configuration on your Internet modem/router. The diagrams below show typical network configurations using a "Public Bridge" network.
The KVM instructions describe how you can set up a public bridge on your host using commands, the results of which are temporary (until you next reboot), and also how to change the interfaces file so that the configuration is permanent (note that from version 18.04, Ubuntu uses a YAML file to configure networking (this link shows how to configure bridged networking in the YAML file - as the poster wrote, don't try to copy and paste the example, because you cannot use tabs to indent in a YAML file, only spaces). Using the command-line is useful, in that you can experiment with a new configuration, but nothing is permanent until you change the interfaces file.
A soft-bridge in Linux will only be persistent (i.e. will still be there after you reboot) if it is attached to a real physical interface. In the first diagram below, the soft-bridge is attached to the Ethernet interface. This is because most WiFi interfaces do not support bridging. If you have a modern computer, this may not be true, so it may be worth experimenting before deciding on your networking architecture.
VirtualBox comes with a range of built-in networking connection options. These include:
This configuration is designed for setting up a web-server as a virtual machine. All VMs can be accessed from the host, from other PCs on the local network (depending on the firewall settings in the host and each VM), and also from the Internet (depending on the port-forwarding settings in your Internet modem/router). All network traffic to and from the VMs goes via the Ethernet interface; if you want it to go via a wireless adaptor, you will need to enable router forwarding on the host. If you are running even one web-server VMs, along with other non-server VMs, then I suggest that you run them all using this network configuration.
The Ethernet interface (eth0) has no IP address of its own; the soft-bridge (br0) has the IP addesss instead.
First, follow the instructions here) on creating the bridge. Then, to set it up permanently, modify /etc/network/interfaces to look like this. Before modifying your interfaces file, please save a backup copy of the unmodified file (e.g. as interfaces.orig).
For virtual machine networking on a laptop host, you have the choice of having your VMs attached directly to you your home or office LAN, or using NAT.
If you attach your VMs directly to your home or office LAN, you can simply use a tapped connection. For virt-manager, this requires that you creat a soft-bridge and a tap for each VM, as described above. For VirtualBox, you just need to select a tapped conection for each VM network connection in the VirtualBox configuration.
You can then configure the VM's internal network interface for static or dynamic addressing, as required.
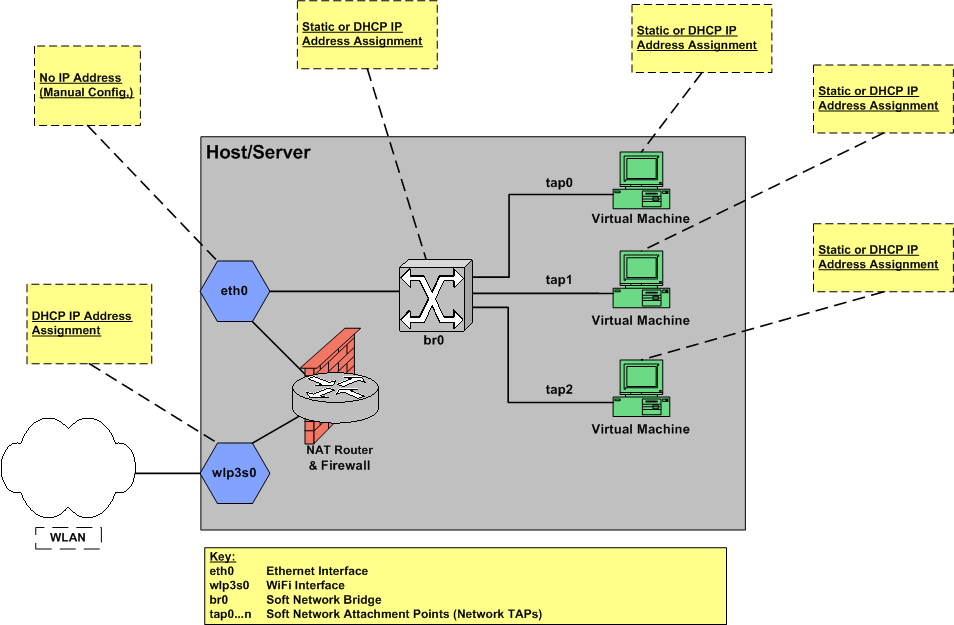
Use NAT routing if you want your VMs to utilise the IP addresses of you host computer.
This configuration is a little more complicated, because of the limitations of wireless interfaces with bridging. Most laptops need to work over WiFi, so that they have Internet access when on an office or hotel network, and the bridge usually cannot be connected to the wireless interface.
In the VirtualBox network settings, configure the network interface that you want to use (normal number 1) as "NAT".
When you start the VM, configure the network adapator's IPv4 settings to "obtain an address dynamically" (use DHCP).
If you also want to have an IPv6 address, you will probably also want to configure the network adapator's IPv6 settings to "obtain an address dynamically".
Since virt-manager has no built-in NAT functionality, you will have to use a NAT script, described below (only for a Linux host). This must start before you start the VM, either at boot time, or manually (e.g. in a script which starts the NAT script and then starts the VM.
The description below is for an Ubuntu 16.04 host. The same is possible for later Ubuntu versions, but check the documentation on how to edit the YAML file to achieve the same result.
In this example the set-up creates a separate network, bridged to the Ethernet adaptor, with an address range that is distinct from your home or office network. Connection of this internal network, to which your VMs are attached, is achieved using NAT routing, as shown in the diagram, which usually routes data via the WiFi adaptor.
There are two disadvantages to this approach. It is not suitable for connections to your VMs from outside your host, so no good for servers, and no good for RDP or SSH access to your VMs except from the host. It also means that your Ethernet adaptor cannot be used to connect to the external network (although there is a way to enable this, described later); you have to use the WiFi. If you need to use the Ethernet adaptor, then use the server configuration described in the previous section. If you need to switch between WiFi and Ethernet, you will probably want to have both versions of the interfaces file, and swap-in whichever one you need, and either reboot, or restart the networking service ('service networking restart') for the changed interfaces file to take effect.
I have used static addressing with this network configuration, on my laptop. If you want to use dynamic address assignment, you will need to add a DHCP server to your host (laptop).
First, follow the instructions here) on creating the bridge.
Here is an example /etc/network/interfaces file.
Setting up a NAT (masquerading) router is very quick and easy. You will need to:
Desktop Windows only allows you to have one IPV4 and one IPv6 address per network interface, so the techniques described here cannot be used if you use Windows as a host for your VMs.
Linux allows you to have multiple addresses on each network interface (bearing in mind that your WiFi adaptor hardware/firmware may not support this), which enables some cleverer solutions, the most useful of which are:
In principle, according to the documentation, you can assign multiple addresses to an interface, including both static and dynamic addresses, in the hosts network configuration (in the interfaces or YAML file), so that they are estabished at boot-time. In fact, this does not work, so don't waste your time trying.
What does work is to make additional address assignments after boot-up, in a script. You can use this technique to add a static IP address to the Ethernet interface to which you have attached your soft-bridge. You can also use it to add a private LAN between your host and your VMs.
Another option is to get an IP address dynamically assigned to your network interface via DHCP (by your router/Internet-modem), and then to use a script to attach a soft-bridge with its own static IP address to the network interface. This set-up will not be permanent; it will need to be redone after each reboot.
Here is an example script which I use to start my VirtualBox VM, which assigns an additional static IPv4 address to the Ethernet interface:
#!/bin/sh
# Script to create a static IP address and start the VirtualBox application.
echo "To use NAT, disable NIC #2 and enable NIC #3"
echo "To use DHCP, enable NIC #2 ND disable NIC #3"
echo "Continue? Type ^C to abort and change VirtualBox NIC settings, or anything else to continue."
read response
# Add internal-only static IP address to enp2s0 - gives the VM access to PDF printers on the host
ip address add 192.168.7.1/24 dev enp2s0
ip address show enp2s0
ip address show wlp3s0
sudo -u vmuser /usr/bin/virtualbox &
If you want to make a copy of a virtual disc (used by a VM), this is easy to do. You might want to make a copy to:
The following are largely default settings.
| CPUs | 2 | Not important, but I usually use 2 |
| RAM | 4096 MB | |
| Disk Type | IDE | |
| CDROM | /dev/sr0 | using default IDE driver |
| Network | Bridge to br0 (soft-bridge) | |
| Other settings | Default |
The following are largely default settings.
| CPUs | 2 | Not important, but I usually use 2 |
| RAM | 5125 MB | |
| Disk Type | SATA | |
| CDROM | /dev/sr0 | using default SATA driver |
| Network | Bridge to ethernet or WiFi adaptor | or to an existing TAP e.g. tap9 |
| Other settings | Default |
sudo kvm -hda /media/VM/vdiskU32.img -net nic,macaddr=AE:AA:BC:C0:A3:2F -net tap -m 1000 -smp 2 -vnc 127.0.0.1:2 -usbdevice tablet &